Location Settings
The menu provides access to settings specific to the current Location.
For more on multi-location setting systems see Locations.
- Location Settings
Shows Tab
Settings in the Shows tab are used to configure options available when creating and editing Shows using the Show Record.
Categories
A Category is an option used to group like Shows together. Sports, Meetings, Arts & Entertainment are all examples of categories.
From this screen, you can create a Category by clicking + New Category. Clicking on any Category in the list will bring up its details, where it can be changed or deleted.
Custom Fields
Custom Fields allow you to store additional data as part of a Show record. These fields are searchable within Cablecast and are available for public use through the Public Site, Reporting, and Cablecast APIs.
Cablecast supports unlimited Custom Fields. To create a new field click + New Custom Field. When creating a new field you can choose from the following field types.
- Text: Supports single line and multi-line text input. For example, a show description could be stored in a text field.
- List: Supports a pre-defined set of options. Use List fields to build drop down lists where you want to tightly control the format of the custom field value.
- Date: Supports entering a calendar date. For example, a production due date could be stored in a date field.
- Number: Supports entering a number including decimals. Use the number fields to store values, like production budget.
- File: Allows attaching a file to a show record. Combined with Public Site Show Fields you can attach a pdf and have it viewable in the public site.
- Producer: Allows associating a Cablecast Producer to a show record. Use producer fields to attach more than one producer to a show, such as a Camera person.
To edit an existing field click Edit next to the field you want to edit. The following options are available when editing or creating:
- Name: A descriptive name for the field.
- Select Options: Add and Remove options for the select list. Use the to add new options and the button next to an option to remove them. The order of the options can be controlled by dragging and dropping the three horizontal lines to the left of the option.
- Input: Text options allow selecting the type of input to use in the Show record. Multi-line input is for long form text while single-line text is for shorter pieces of text.
Dispositions
Dispositions set the current state of a piece of physical media.
Each Disposition has the following options:
- Name: A descriptive name for the disposition. This value will be shown throughout Cablecast.
- Allow Assignment: This setting determines if Autopilot will permit media having the given disposition to be assigned for playback.
Formats
A Format is used to link to the devices that can play it. The Formats screen can be used to add, edit, and delete Formats. The fields of a Format are described below.
- Formats: The name of the format. This value will be displayed in the dropdown when selecting a format.
- Primitive Format: The type of device the Format is compatible with. The Primitive Format will affect what Devices can use the Format. For more information see Primitive Formats.
The configuration options for a Format are described below.
- Generic: Use for devices that do not fall into any of the below categories. Generic devices do not require any special configuration to operate. Tape devices that do not support Timecode are an example of Generic devices.
- Timecode Tape: Use for tape devices that can be queued to a specified timecode.
- DVD: Use for DVD players and changers.
- Digital File: Use for video server devices that playback a piece of digital media requiring a filename such as the SX Video Servers.
- Live: Use for live inputs into the routing switcher such as studio and satellite feeds.
- Network Stream: Use for live sources that are delivered as a network stream. These streams will be played or recorded by a compatible video server.
IFrames
The IFrames settings screen allows you to configure sections of the Show Record that will display external websites. This is useful for integrating with 3rd party tools.
Each IFrame has the following settings:
- Title: The text that will be used for the heading of the Show Record section.
- IFrame Height: The desired height of the IFrame in pixels.
- URL: The page that should be used as the IFrame.
The field can include replacement patterns that will be replaced with data about the specific Show that is loaded. Click to see all available patterns.
Projects
Projects are groups of Shows, typically a series of programs.
- You can create a new Project by clicking
+ New Project. - You can click to select an existing Project to edit or delete it.
Each Project includes the following options:
- Name: A descriptive name for the Project.
- Description: A longer description of the project.
- Producer: The producer that normally creates episodes of this Project. You can still set the Producer of individual Shows within the Project.
- Podcast: If this box is checked, Cablecast will automatically expose an iTunes compatible Podcast feed for all episodes of this Project.
Schedule Tab
The Schedule tab allows you to configure various Schedule related settings.
Blocks
Blocks serve as a template for the Advanced Paste operation in the Schedule. You can create a new block by clicking + New Block. You can click an existing block in order to edit it.
Each block has the following settings:
- Block Name: A descriptive name for the Block. This name will show up in the Advanced Paste screen.
- Given Run at: Source Day: Sets the date that the rest of the fields will base their calculations on.
- Given Run at: Source Time: Sets the time that the rest of the fields will base their calculations on.
- Paste To: Add as many individual dates as needed. After a date has been added you may add times.
I/O Tab
The I/O Tab allows you to configure your system's devices, router, inputs, outputs, video on demand and live streaming.
Control Module Sets

The Control Module Sets screen allows you to configure the Control Modules that will be used to control the various devices that comprise your system. Each row in the table represents a Control Module that is running on a Server. Each Control Module controls a specific type of device.
The following settings are available for each Control Module Set:
- CMS Name: A descriptive name. This field is the label that will be shown throughout Cablecast.
- Control Module: Select the Server / Control Module combination needed for your device. This list includes every Control Module that is running on each configured Server.
- See Servers for more information.
- Port/IP: The IP address and port of the resource on the network.
- Actions: Methods of interaction with this Module.
For detailed information about configuring individual Control Modules see the Cablecast Control Module Reference.
Router
This screen allows you to select which Control Module Set controls the Routing Switcher.
Devices
The Devices screen allows you to configure the Inputs of your Routing Switcher as well as the devices that are connected to them.
Each row in the table includes the following fields:
- Router Input: The Routing Switcher input that the device is connected to. This field will be empty for devices.
- Name: The descriptive name for the device. Clicking the will open the Device Edit screen which is described in Editing Devices.
- Runs: The total number of Shows that the device has played.
- Active: Indicates whether or not this device is available for use.
Editing Devices
The Device Edit screen hides and displays various fields depending on the options you choose. Not all of the following fields will be shown at the same time.
The following fields are available:
- Name: A descriptive name for the device. This field is used as a label throughout Cablecast.
- Active: Sets whether or not this device is available for use.
- Device Function: Sets what functions the device is able to perform. See Device Functions for an explanation of possible values.
- Device Type: Sets the class of device that is connected. See Device Types for an explanation of possible values.
- Router Input: The Routing Switcher Input number that this device is connected to.
- Router Output: (Only shown for devices that support recording) Sets the routing switcher output that is connected to this device.
- Device CMS: Sets which Control Module Set is responsible for controlling this device. Multiple devices can be configured to use the same CMS.
- See Control Module Sets for more information.
- Shadow CMS: Sets a secondary Control Module Set which can be used to provide redundancy in the event that the primary device fails. Both devices will receive identical events from Autopilot.
- Device Address: This field is only required for certain Control Modules. Sets the sub-device that is to be controlled when multiple Devices are using the same Control Module Set.
- Device Formats: Select up to three that the device is capable of playing. See Formats for more information.
- Wake Device: Tick this box if this device has a power-saving function that needs to be deactivated before playback can start.
- Wake Duration: Sets the amount of time (in seconds) that should be allotted for the Wake Sequence to complete.
- Load Duration: Sets the amount of time that is required for this device to complete a Load command. You will need to manually time the device in order to find the appropriate value.
- Jump Duration: Sets the amount of time that is required for this device to complete a Jump command. For linear devices such as a Timecode VTR this field should be set to the maximum amount of time that it could take, such as cueing from the end of a tape to the start.
- Take Delay: Sets the interval (in seconds) between the Play command to the device and the Take command to the routing switcher. Some devices (such as VTRs) take a few seconds to actually start playback. Correctly setting this value will prevent the tape startup from appearing on-air.
- Post Roll: Sets the interval (in seconds) between the end Take command to the routing switcher and the user-defined .
- Device End Action: Select one or more Actions that should be performed at the end of a scheduled playback.
For Video Server Playback Devices:

- Device Resolution: This settings determine the resolution of the output signal.
- Audio Normalization: Determines whether audio normalization will be applied to the playback signal. If enabled, the Target Loudness is used to set the normalization level. The value is in LUFS.
- Volume Adjustment: If Audio Normalization is not enabled, the Volume Adjustment is used to set the absolute audio adjustment applied to the playback. The value is in dB's.
- NDI Output: If this box is checked the video server will generate an NDI output stream for this device.
For Video Server Record Devices:
- Volume Adjustment: The Volume Adjustment is used to set the absolute audio adjustment applied to the encoder input. The value is in dB's.
Device Functions
- No Device: Instructs Cablecast that there is no controllable device connected to this input. This setting is almost never used.
- Playback Only: This device is used for automatic playback of scheduled programming.
- Record Only: This device is used for automated recording.
- Playback & Record: This device is capable of both playback and recording functionality. Note: this option implies that the device cannot perform both tasks at the same time. If your device is capable of both (like most video servers) you will need to create two separate devices.
- GPI: This device is a GPI interface device which can be automated using Manual Events.
Device Types
- Generic: Represents a standard VTR, or devices that perform similarly. This device will receive a Play command to initiate playback.
- VTR(TC): Represents a VTR that is capable of cueing tapes based on Timecode. This device will receive a Cue command prior to playback followed by a Play command.
- VTR(TC-Multitape): Represents a Timecode-capable VTR that can hold multiple tapes simultaneously. This device will receive a Load command to load the correct tape, a Cue command to cue it to the correct segment, followed by a Play command to initiate playback.
- DVD: Represents a DVD player. This device will receive a Jump command which sets the Title and Chapter to be played followed by a Play command to initiate playback.
- DVD(Multidisc): Represents a DVD changer. This device will receive a Load command to load the correct disk, a Jump command to select the appropriate Title and Chapter followed by a Play command to initiate playback.
- Digital File: Represents a video server. This device will receive a Cue command to select the correct file and start position followed by a Play command to start playback.
- Live: Represents a Live source. No command is sent to start playback for live sources.
- Bulletin Board: Represents a source that is available at all times such as an on-air character generator.
File Stores

Different devices can specify different File Stores (if applicable). If the device is "Playback and Record", you'll be able to select both types of File Stores. However, if the device is playback only, or record only, you'll only see their respective settings.
You can select the File Stores by clicking on the items within the list. To select multiple File Stores, hold control on your keyboard while selecting items. To commit your changes to the File Store(s), Save the device by selecting Save at the bottom of the page UI.
Network Streams
The Network Streams screen allows you to configure Network Streams that can be used throughout Cablecast.
The following fields are displayed in the table:
- Name: The descriptive name of the Network Stream.
- URL: The uniform resource locator for the stream.
- Edit: Button for editing that stream
Editing Network Streams
The following fields are displayed:
- Name: A descriptive name for the stream. This value will be displayed throughout Cablecast.
- Type: The type of Network Stream (RTP, HLS Live/VOD, NDI, RTMP, RTSP, YouTube Live)
- Address: The host's IP address or DNS name for the stream.
- Generate Captions: Select to enable caption generation for this stream.
- Provider: Which Captioning appliance to automatically generate captions with.
- Vocabulary: Which custom vocab to use (If configured)
- Standby Graphic: Which graphic to use as a standby graphic when source is not playing
Outputs
The Outputs screen allows you to configure the outputs of your routing switcher.
The following fields are displayed in the table:
- Router Address: The routing switcher output number.
- Name: A descriptive name for the output. This field is used as a label throughout Cablecast. Clicking the Name will open the Edit Output screen as described in Editing Outputs.
- Active: Determines if this output is currently available for automation or not.
Editing Outputs
The following fields are displayed:
- Router Address: The routing switcher output number.
- Name: A descriptive name that will be used as a label throughout Cablecast.
- Type: Either Preview or Channel. An output that is configured as Channel will be the final destination for a schedule, while a Preview output is used for internal monitoring of sources.
- Default Input: The Device that should be on-air when nothing is scheduled, such as a bulletin board.
- Primary Device: The video server Device that will air all the channel's video server content. It will also be used to passthrough video from available encoders on the same server.
- Fade CMS: The Control Module Set that controls fade-to-black for this channel.
- Rating CMS: The Control Module Set that controls V-Chip rating insertion for this channel.
- Default Rating: Sets the V-Chip rating that should be used if one is not set for a specific show.
Video On Demand
This screen allows you to configure Video on Demand for your station.
The following settings are available:
- Video on Demand Server CMS: The Control Module Set for the Video on Demand server.
- Store New VODs: The File Store where newly transcoded Videos on Demand are placed.
- Store Additional VODs: One or more File Stores where newly transcoded Videos on Demand are placed if the primary store becomes full.
- Maximum Resolution: Sets the transcoding quality that will be used if one is not set in the specific Show.
- Multiple Audio Program: Sets the default behavior for VODs with more than one audio source. Individual VOD MAP configurations will override this configuration. Setting this configuration to Default will have VODs defer to System Settings.
- Primary Audio Label: The primary audio source's display label.
- Primary Audio Language: The primary audio source's language.
- Secondary Audio Label: The secondary audio source's display label.
- Secondary Audio Language: The secondary audio source's language.
- Embed Template: Sets the HTML that will be used to generate embed codes for VOD files. Clicking will set the back to the factory default setting.
- Template Tokens: These tokens can be utilized within the in order to further customize it.
Live Streaming
This screen allows you to create and delete Live Streaming Configurations using the new and delete buttons.
Clicking on the name of a stream will open the Edit Live Streaming Configuration screen.
Edit Live Streaming Configuration
This screen allows you to adjust the settings for a particular Live Streaming Configuration.
The following fields are available:
- Name: A descriptive name. This field is used as a label throughout Cablecast.
- Channel: Select the Channel that this stream will show.
- Device: Sets the device which will run the Live Stream.
- Multiple Audio Program: Enable for Live Streams with more than one audio source.
- Primary Audio Label: The primary audio source's display label.
- Primary Audio Language: The primary audio source's language.
- Secondary Audio Label: The secondary audio source's display label.
- Secondary Audio Language: The secondary audio source's language.
- Stream Resolution: Sets the input resolution that the encoder should be configured to use. This must match the resolution of the video connected to the encoder's input.
- Qualities: Sets the encode qualities that should be used. You may select more than one quality.
- Live Streaming Exempt Paused Template: The HTML template that should be displayed when an on-air program is set as Live Streaming Exempt.
- Stopped Template: The HTML template that should be displayed when the stream is stopped.
- Embed Template: The HTML template that should be displayed when a user views the stream.
- Restore Default: Resets the given template to the factory-default value.
- Template Tokens: These tokens can be used in any of the templates to further customize the.
Network Stream Destinations
This screen allows you to create and configure Network Stream Destinations. Network Stream Destinations enable the ability to publish server outputs to a third party. If your Cablecast Cloud Services is configured with one or more Social Integrations, you will be able to publish to social platforms, such as YouTube and Faceboook.
Editing Network Stream Destinations
Click + New Stream Destination or Edit on an existing Network Stream Destination to create or reconfigure.
The following fields are available:
- Stream Type: The type of Network Stream Destination.
- Generic RTMP(s): Publish to a generic Real-Time Messaging Protocol.
- YouTube: Publish to YouTube.
- Facebook: Publish to Facebook.
- Integration: The Social Integration this destination is attached to. Only present for non-Generic RTMP(s).
- Name: Name of the Network Stream Destination.
- Stream URL: Network stream URL. Only present for Generic RTMP(s).
- Stream Key: Network stream key. Only present for Generic RTMP(s).
Configuring Social Integrations
If you have not yet created a Social Integration on Cablecast Cloud Services, please reach out to the Cablecast Sales team at sales@cablecast.tv for more info.
Social Integrations require your Organization in Cablecast Cloud Services to have authenticated with the platform in question. Once at least one integration has been authenticated and your Network Stream Destination is configured to a social platform Stream Type, you will see your integration under the Name dropdown. The Stream URL and Stream Key configuration options will no longer be present, as they will be automatically populated by Cablecast on Save.
To manually refresh the status of your Social Integrations within Cablecast, click the Refresh button.
Utilizing Network Stream Destinations

After you have configured a Network Stream Destination, it's time to schedule the broadcast. Scheduling a live Show on the Schedule will now show a new Sattelite icon to the right of your run for you to create the broadcast event. Clicking this button will bring up the Run Details Overlay with the Network Broadcast Settings tab open. Choose your Social Integration, Network Stream Destination, hit Save, and Cablecast will send the event to the social platform during the next Autopilot send so it will be ready to go live.
Autopilot Tab
One option is available here:
- Configuration: Configuration settings for this system's Autopilot feature
Autopilot
The Autopilot settings screen includes default options that will be use when Sending Autopilot. If you find that you are adjusting the parameters of your Autopilot send each time, you might consider changing these defaults.
The following settings are available:
Autopilot Send Settings
- Range: How many days out an Autopilot send should default to.
- Bump Warning: Controls the Send Report screen that appears after the send finishes and adjusts the warning threshold based on bump length.
- Use Sticky Devices: Tick this box if you would like Sticky Devices enabled by default. See Sticky Devices for more information.
- Send Events to Hardware: This box should normally be ticked. You may sometimes want to disable sending events to hardware for troubleshooting purposes.
- Clear Bumps: Ticking this box will cause Cablecast to reset the bumps on all Shows when Autopilot is sent. For best results, you should keep this box ticked.
- Automatically Send Autopilot: Allows Autopilot to automatically send based on a custom schedule.
- Time: Time of day to send Autopilot.
- Days: Which days of the week on which to send Autopilot. You can select as many as you see fit.
When using automatic Autopilot sends, it's recommended you also configure email notifications. In the event of errors or failures, you will receive an email detailing the issue.
Email Notifications
For this feature to work, make sure your Email Server Settings are configured properly in FrontDoor.
You can list email addresses to get reports when there is an Autopilot send failure or error. This is most useful when paired with the automatic Autopilot send feature.
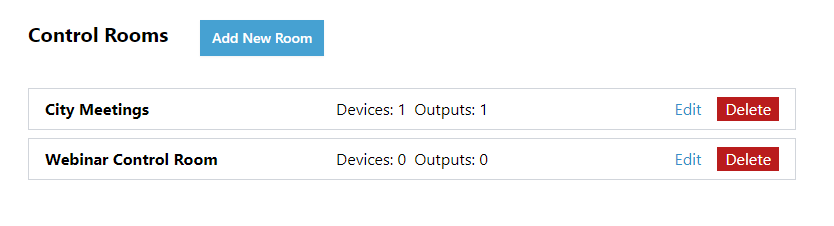
Control Rooms
Control Rooms are where rooms can be edited, deleted, or created.
Editing a Control Room
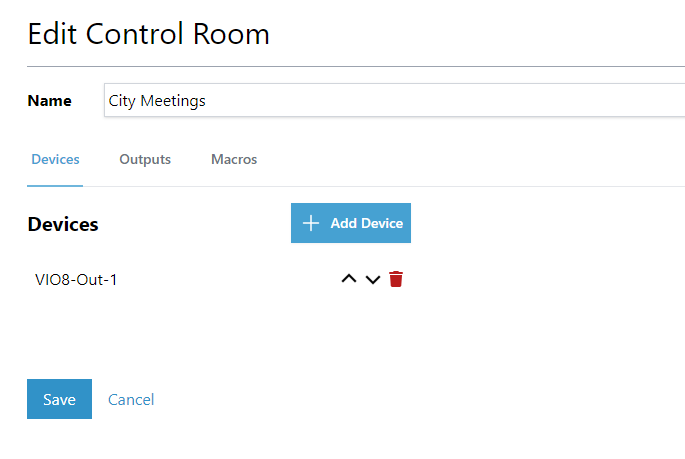
- Name: Change the name of the Control Room.
- Devices:
- Add: To add a new device, click on the plus icon next to Devices.
- Delete: To delete a device, click on the red trashcan icon of the device you would like to delete.
- Edit Device Order: Click on the up chevron to move a device up in order, and the down chevron to move a device down in order.
- Outputs:
- Add: To add a new output, click on the plus icon next to Outputs.
- Delete: To delete an output, click on the red trashcan icon of the output you would like to delete.
- Edit Output Order: Click on the up chevron to move an output up in order, and the down chevron to move an output down in order.
- Save: Click to save any changes.
- Cancel: Click to cancel any changes.
- Macros:
- Add: To add a new macro, click on the Add Macro button.
- Delete: To delete a output, click on the red trashcan icon of the output you would like to delete.
- Edit Order: Click on the up chevron to move a output up in order, and the down chevron to move a output down in order.
Macros

Macros are custom commands that run a set of predefined events. You can utilize macros while operating in a Control Room.
Hitting the Add Macro or Edit buttons will bring up an overlay to configure a macro. You can assign each macro a name and a hotkey with which to activate it. Hit the Add Step button to add an additional event for the macro to run. These steps can be re-ordered by hitting the arrow icons and edited by hitting the edit icon.
Editing a step in a macro will allow you to change the step's name and type. The step's type will determine what other information is required. For example, choosing Device Action will prompt you to select the Device Source and what Action to perform on the device.
Hit Done after editing both your steps and macros to persist your changes.